完成元素拖动后,接着做连线,连线由几部分组成
- Endpoint 端点,默认为圆点
- Connector 连接线,默认为贝塞尔曲线
- Anchor 锚点,不可见元素,跟Endpoint是绑定的,在动态创建连接线时使用
- Overlay 覆盖物,如连线上的箭头,也可以是文字或dom元素
当容器append了一个dom后,调用addEndpoint来增加输出和输入端点,该函数接受3个参数,分别是dom,参数以及附加参数
共用的参数可以写进附加参数,然后参数里相同的属性会进行覆盖 参数详细介绍在这里 addEndpoint
1 | jsPlumb.addEndpoint(newDom, { isTarget: true, anchor: "Left" }); |
增加输出和输入端点后,即可进行连线
连线操作OK,有点丑,加个样式看看
1 | var connectorStyle = { |
为了区分输出和输入端点,把输出点改为空心样式
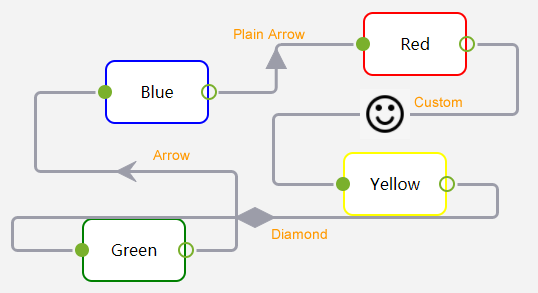
看着感觉有点怪,少了箭头,接着添加覆盖物overlay
overlay有几种类型
- Arrow 箭头
- Plain Arrow 平底箭头,相当于[“Arrow”, { foldback: 1}]
- Diamond 钻石,相当于[“Arrow”, { foldback: 2}]
- Label 就是文本
Custom 自定义,支持HTML
上文[“Arrow”, { foldback:1}]中的foldback是调整粗细的,常用属性还有location,用于调整XY位置
- 当0≤ x,y ≥ 1时表示距离source的百分比,0.5就是中间
- 当 > 1时表示距离source的像素,10就是距离source 10个像素的位置
- 当 < 0时表示距离target的像素,-5就是距离target 5个像素
Label属性用在label标签上, [ “Label”, { label:”cat”, id:”label”, location:[-0.5, -0.5] } ]
加入overlay有几种途径
设置全局默认属性
1
2
3
4
5jsPlumb.importDefaults({
ConnectionOverlays: [
["Arrow", {location: 1}]
]
});创建端点时,附加属性来控制,比如前面的connectorStyle
1
2
3
4
5
6
7
8
9
10var connectorStyle = {
connectorOverlays: [
["Arrow", {location: 1, id: "arrow"}],
["Label", {
label: "21ido.com",
location: 0.5
}
]
]
};overlay是可以多个,这样在连线是除了箭头,还多了文字

connect方法动态创建
在调用jsPlumb.addEndpoint时,将返回endpoint对象,假设连线是通过JS创建,而不是鼠标拖动完成
1
2
3
4
5
6
7
8
9
10
11
12jsPlumb.connect({
source: pointSource,
target: pointTarget,
overlays: [["Custom", {
create: function (component) {
return $("<img src='http://bpic.588ku.com/element_origin_min_pic/00/93/91/4056f2b13a70c32.jpg' />");
},
id: "smile"
}
]]
});动态创建连线,overlay是自定义html元素,一个笑脸图片
除了连线overlay,端点也可以增加overlay,比如在源端点增加一个文字
1
2
3
4
5
6
7
8
9
10
11
12
13
14
15
16
17
18
19jsPlumb.addEndpoint(newDom, {
isSource: true,
anchor: "Right",
paintStyle: {
stroke: "#7AB02C",
fill: "transparent",
radius: 7,
strokeWidth: 2
},
overlays: [
["Label", {
label: "source",
id: "label",
location: [3, 0.5],
cssClass: "endpointLabel"
}
]
]
}, connectorStyle);效果如下图
